I 25 luoghi migliori per vedere l'aurora boreale in Islanda
Come fotografi e cacciatori dell'aurora boreale di Aurora Reykjavík, abbiamo trascorso innumerevoli notti sotto gli incredibili cieli islandesi. Con anni di esperienza, conosciamo i luoghi migliori per catturare le aurore. E come divertirsi mentre lo fai!
Whether you’re heading out for a solo adventure or joining a tour, we’re here to share our favorite spots to watch the northern lights. Spoiler alert: there’s no single “best place” to see them because the lights can pop up anywhere!
That said, some spots are more scenic or easier to reach than others, so we’re breaking down 25 of our top picks.
Immergiamoci nei nostri luoghi preferiti per vedere l’aurora boreale e aggiungiamo qualche consiglio di sicurezza per tenerti al caldo e comodo durante l’avventura. E se non hai voglia di organizzarti da solo, ci pensiamo noi con i tour guidati. Perché a volte è bello semplicemente sedersi e godersi lo spettacolo.

1. Grótta Lighthouse: One step outside of Reykjavik!
Here, you will automatically face North if you observe the lighthouse. This is the direction where the lights usually occur from.
Consigli da esperti
- Arriva presto per la miglior visuale: Grótta è popolare, soprattutto durante la stagione dell'aurora boreale. Arrivare presto ti consente di assicurarti i posti migliori, soprattutto se desideri includere l'iconico faro di Grótta come elemento in primo piano. Ciò aiuta a incorniciare magnificamente l'aurora boreale, aggiungendo struttura alla tua composizione.
- Sta' attento alle maree: controlla il programma delle maree prima di partire. Grótta è circondata dall'acqua e durante l'alta marea alcuni sentieri possono essere inaccessibili. Non rimanere bloccato sull'isola!
- Impostazioni per l'aurora boreale: utilizza un treppiede e imposta l'esposizione tra 5 e 20 secondi, a seconda dell'intensità dell'aurora. Un obiettivo grandangolare è l'ideale, poiché ti consente di catturare sia le luci che il vasto paesaggio costiero. Inoltre, mantieni il tuo ISO tra 1600-3200, regolandolo in base alla luminosità dell'aurora e all'oscurità circostante.
- Primo piano con il faro: includere il faro di Grótta nello scatto aggiunge un senso di luogo e scala, creando un punto focale accattivante contro le luci danzanti. Usa il faro per incorniciare la tua foto o come silhouette per enfatizzare il cielo vibrante.
- Cattura i riflessi nelle piscine: se la marea è bassa, cerca pozze poco profonde lungo la spiaggia che possano rispecchiare le aurore. Poiché questi riflessi aggiungono uno strato di profondità e interesse visivo, le luci appaiono ancora più magiche.
2. Garður Lighthouse: As far as you can go!


3. Reykjanesviti Cliffs: Nature at its most raw!
L'edificio è circondato da aspre scogliere, paesaggi vulcanici e sorgenti termali geotermiche. Appena al largo, spettacolari faraglioni si innalzano dall'oceano, aggiungendo un elemento sorprendente alla scena. In questo luogo unico si possono trovare viste ininterrotte sul Nord Atlantico, perfette per gli appassionati dell'aurora boreale. Le aurore che danzano sul faro, con i faraglioni che si stagliano contro il cielo vibrante, creano un'esperienza affascinante e indimenticabile. Reykjanesviti è davvero una destinazione ideale per chi cerca un luogo panoramico e appartato per assistere alla magia dell'aurora boreale.
4. Blue Lagoon: Combine comfort and beauty!


5. Kleifarvatn Lake: Let the calm inspire you!
Ci sono diversi piccoli parcheggi lungo la strada, con tanti punti panoramici.
6. Þingvellir National Park: See the lights between the continents!


7. Gullfoss Waterfall: A true adventure!
8. Geysir Geothermal Area: Double the surprise, double the fun!
Ecco alcuni suggerimenti per sfruttare al meglio la tua visita:
- Il posizionamento è fondamentale: arriva presto per scovare gli angoli migliori. Stai leggermente decentrato per evitare di essere schizzato quando Strokkur erutta e scegli un punto che ti offra una buona visuale del paesaggio circostante per una maggiore profondità nei tuoi scatti.
- Conosci i tempi: Strokkur erutta all'incirca ogni 5-10 minuti, quindi tieni la fotocamera pronta. Utilizza una velocità dell'otturatore elevata per congelare il momento esplosivo o rallentarlo per un effetto più morbido e soffuso, soprattutto in condizioni di scarsa illuminazione.
- Catturare l'aurora boreale: se stai fotografando le aurore, un treppiede è essenziale. Imposta l'esposizione tra 5 e 15 secondi, a seconda dell'intensità della luce, e regola l'ISO per catturare i dettagli.
- Considera il primo piano: le pozze intorno a Strokkur riflettono magnificamente l'aurora boreale. Prova a usare il geyser come punto focale e usa i riflessi come elemento aggiuntivo, oppure concentrati sulle sorgenti termali gorgoglianti per un effetto atmosferico.
- Geysir non significa solo catturare la foto perfetta; si tratta di abbracciare il momento, la trepidazione in attesa dell'eruzione e la danza di luce e acqua. Con un po' di pazienza e creatività, te ne andrai con immagini che catturano l'anima dell'Islanda.


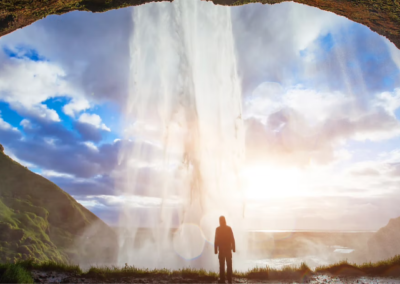
9. Seljalandsfoss Waterfall: Capture the magic of Iceland!
Consigli da esperti
- Tempistica con l'attività solare: Seljalandsfoss è rivolta a ovest, il che significa che avrai bisogno di una forte attività solare per catturare l'aurora boreale nel punto giusto.
- Trovare l'angolazione migliore: uno degli scatti più magici è da dietro la cascata, ma può diventare scivoloso e bagnato, soprattutto di notte. È meglio allontanarsi un po’ lungo la strada, per vedere tutta la cascata, ma lasciare abbastanza spazio per il cielo.
- Elementi in primo piano: gli spruzzi delle cascate aggiungono una bella qualità soffusa ai tuoi scatti. Sperimenta composizioni utilizzando l'acqua come primo piano e le aurore come sfondo. Questo effetto a strati può creare un'immagine davvero dinamica.
- Proteggi la tua attrezzatura: preparati agli spruzzi, potrebbero appannare l'obiettivo e rendere la camminata scivolosa dietro le cascate. Porta con te panni per lenti e coperture protettive, soprattutto se stai cercando di scattare foto dal retro della cascata.
- Diventa creativo con la luce: prova a includere una fonte di luce soffusa, come una lampada frontale o una torcia a bassa potenza, per illuminare delicatamente le parti in primo piano. Ciò può aggiungere profondità alla tua foto, evidenziando i dettagli nelle rocce e nell'acqua senza sopraffare la luce naturale delle aurore. La stessa Seljalandsfoss è illuminata di notte, il che rende difficile l'esecuzione dei primi piani, a meno che non si sovrappongano immagini con tempi di esposizione diversi.
10. Eyjafjallajökull Volcano: The best that Iceland has to offers!
Ecco alcuni suggerimenti per catturarne la magia:
- Controlla l'aurora e le previsioni meteorologiche: il ghiacciaio si trova ad alta quota e spesso può essere avvolto da nuvole o nebbia. Per la fotografia dell'aurora, avrai bisogno di un cielo sereno e di un'attività solare da moderata ad elevata affinché l'aurora boreale sia visibile sul ghiacciaio.
- Trova un punto panoramico: l'Eyjafjallajökull è vasto, quindi trovare un posto con una vista aperta è essenziale. Cerca un terreno più elevato nelle vicinanze o i campi nell'area circostante per una prospettiva che ti permetta di catturare sia il ghiacciaio che il cielo notturno. Un obiettivo grandangolare è l'ideale in questo caso per includere sia il vasto paesaggio che le aurore.
- Impostazioni per l'oscurità: il ghiacciaio e il terreno circostante possono essere piuttosto bui di notte. Utilizza un treppiede e imposta una lunga esposizione, circa 10-25 secondi, per catturare i dettagli del ghiacciaio e del cielo. Mantieni il tuo ISO tra 1600-3200 e sperimenta le impostazioni di apertura per bilanciare nitidezza e luce.
- Include Foreground Elements: If possible, incorporate some foreground elements like the rolling hills or even local landmarks such as the Þórsmörk valley, adding depth to your composition. The layers of land, glacier, and auroras create a powerful visual story.
- Be Prepared for Harsh Conditions: Iceland’s weather can be extreme around Eyjafjallajökull, especially at night. Bring protective covers for your gear and warm clothing for yourself. Strong winds and icy conditions can be common here, so be prepared to adapt quickly.
- Timing with Moonlight: If the Northern Lights are strong and the moon is out, the moonlight can illuminate Eyjafjallajökull, creating a striking contrast with the vibrant auroras above. This added light can bring out the glacier’s textures and add a subtle glow to the landscape.


11. Skógafoss Waterfall: Pure Icelandic beauty!
Pro tips:
- Capture the aurora framed by the waterfall for an awe-inspiring combination of natural phenomena.
- Use a wide-angle lens to capture the full grandeur of the falls and the sky above.
- Consider shooting from the base of the waterfall for a dramatic foreground.
- The mist from the waterfall can make for some interesting long-exposure shots, where the lights reflect off the spray.
12. Reynisfjara Beach: Add some thrill to your aurora hunt!
Photography Tips:
- Use the basalt columns as foreground elements to frame the aurora.
- Capture the aurora’s reflections on the wet black sand after the tide recedes.
- A sturdy tripod is essential to combat the strong coastal winds during long exposures.
Accessibility:
Reynisfjara is accessible year-round, but always exercise caution as sneaker waves can occur. Stay at least 30 meters from the waterline.


13. Kerlingarfjöll: Auroras and steam, the perfect combination!
Pro tips:
- Capture the contrast between the glowing aurora and the steaming geothermal vents.
- A wide-angle lens will help include the dramatic landscape and sky.
- Plan your visit for early autumn or late spring when the highland roads are passable.
Accessibility:
Kerlingarfjöll is typically accessible from late June to early September. Roads may require a 4×4 vehicle.
14. Jökulsárlón Glacier Lagoon: We put the ice in Iceland!
Photography Tips:
- Capture the Northern Lights as they reflect off the calm waters of the lagoon for a stunning mirrored effect.
- Use the floating icebergs as foreground elements to add scale and drama to your shots.
- For a unique perspective, shoot from various spots along the shoreline for different angles of the aurora and ice.


15. Vestrahorn: Capture the wall of light!
Photography Tips:
- Use the black sand dunes and shallow tidal pools in the foreground to create stunning reflections of the aurora and the Vestrahorn peaks.
- A wide-angle lens is essential to capture both the Northern Lights and the towering mountains in a single shot.
- For dramatic results, shoot during low tide when the reflections on the wet sand are more pronounced.
- Be mindful of the coastal winds, especially in winter, and dress warmly when waiting for the lights to appear.
16. Arctic Henge: as North as possible!


17. Dettifoss Waterfall: Take the opportunity when you can!
Pro tips:
- Position yourself at a distance to capture the entire waterfall under the aurora.
- Long exposures will soften the water’s movement while emphasizing the aurora’s brightness.
- Use waterproof gear to protect your equipment from mist and spray.
Accessibility:
Dettifoss is typically accessible in the summer months. During winter, the roads are often closed due to snow and ice.
18. Aldeyarfoss Waterfall: The effort is worth it!
Photography Tips:
- Frame the waterfall with the basalt columns and aurora for a dynamic composition.
- Shoot long exposures to blur the water’s motion while keeping the aurora crisp.
- Wear crampons to navigate icy trails safely during autumn or early winter.
Accessibility:
Best visited in summer or autumn before heavy snowfall blocks access. A 4×4 vehicle is recommended.


19. Lake Mývatn: See it to believe it!
Photography Tips:
- Focus on reflections in the lake’s still surface for a dramatic effect.
- Use the pseudocraters or lava formations as foreground elements.
- Scout locations during daylight to find the perfect vantage point for unobstructed views.
Accessibility:
Lake Mývatn is accessible year-round, but icy roads in winter may require caution.
20. Goðafoss Waterfall: Get close to Valhalla!


21. Hraundrangar Peak: Be swept away by Iceland’s magic!
Consigli da esperti
- Use the peak as the central element, creating a dramatic focal point.
- Include foreground elements such as snow-covered rocks or vegetation to add depth.
- Experiment with longer exposures to capture aurora motion and surrounding stars.
Accessibility:
Hraundrangar is accessible year-round, but winter conditions may require careful navigation of icy roads.
22. Hvítserkur: Are you ready to face the Troll?
Photography Tips:
- Capture Hvítserkur’s reflection in the shallow water during low tide.
- Use a wide-angle lens to frame the aurora and the sea stack together.
- Long exposures will enhance the aurora and create smooth water textures.
Accessibility:
Accessible year-round, but icy roads in winter require caution and a 4×4 vehicle.


23. Kirkjufell: The popularity is well earned!
Photography Tips:
- Use Kirkjufell as the focal point, with Kirkjufellsfoss waterfall in the foreground.
- Frame the scene so that the aurora appears to radiate from the peak of the mountain.
- Arrive early to secure a good spot, as this location is popular with photographers.
24. Snæfellsjökull: See the glacier come to life!
Photography Tips:
- Include the glacier in your composition to highlight its reflective qualities.
- Use a wide-angle lens to capture the aurora sweeping over the glacier.
- Adjust white balance to bring out the natural hues of the glacier and aurora.
Accessibility:
Snæfellsjökull is accessible year-round, but higher elevations may require a 4×4 vehicle in winter.


25. Búðir: A little bit of everything!
Consigli da esperti
- Capture the Northern Lights dancing over the iconic Búðir church for a striking contrast between the lights and the simple, yet stunning, black church.
- Use the surrounding lava fields or the glacier in the background as interesting foreground elements to add depth and drama to your photos.
- A wide-angle lens is essential to capture both the sweeping sky and the silhouette of the church and mountains.
- Long exposure shots will help capture the motion of the aurora, while keeping the church and landscape crisp.
Staying Safe While Hunting for the Northern Lights
Chasing the aurora can take you to remote and often icy locations. Here are some essential safety tips:
- Check the Weather Forecast: Always review local weather conditions on sites like Vedur.is or https://aurorareykjavik.is/aurora-forecast/ to avoid sudden storms or dangerous winds.
- Use Safe Travel Resources: Visit SafeTravel.is for updates on road conditions, weather warnings, and emergency information. Their app is a great tool to have on your phone.
- Drive Safely: Roads in Iceland can be slippery and unpredictable, especially in winter. Use a 4×4 vehicle with winter tires, and avoid off-road driving.
- Stay Visible: Wear reflective clothing and bring a flashlight or headlamp when walking in dark areas.
- Pack Essentials: Carry a fully charged phone, warm drinks, snacks, and a first-aid kit. Extra batteries for your camera and flashlight are also a must in cold conditions.
- Travel with Others: If possible, hunt for the aurora in a group or join a guided tour for added safety and expert knowledge. Check our tours here:
Check out our Northern Lights Locations map and find the best viewing spots:

Grétar Jónsson
Founder of Aurora Reykjavík and one of Iceland’s best-known Northern Lights experts
Grétar has spent decades studying, photographing, and explaining the aurora borealis in Iceland and is a frequent advisor to travelers, guides, and media seeking accurate Northern Lights information.